
Hyperledger Fabric is one of the leading enterprise blockchain platforms. Today we are going to learn how to install it on the latest version of ubuntu 20.04 LTS.
We will be installing the following:
- Git
- cURL
- Docker and Docker Compose
- Go Programming Language
- Node.js Runtime and NPM
- Python
Step 1: Create a new USER
Setup a new user, it’s good practice not to use root to install these software.
sudo adduser "name of new user"
Now we need to add our user to the sudo group.
sudo usermod -aG sudo "name of new user"
Switch to our newly created user:
su - "name of new user"
Step 2: Install Prerequisites
Install Git, cURL, docker, docker-compose, Node.js , NPM & Python
sudo apt-get update
sudo apt-get install git curl docker.io docker-compose nodejs npm python
Update NPM to 5.6.0 and Configure Docker
sudo npm install [email protected] -g
sudo usermod -a -G docker $USER
sudo systemctl start docker
sudo systemctl enable docker
Install and configure GoLang
wget https://dl.google.com/go/go1.13.6.linux-amd64.tar.gz
tar -xzvf go1.13.6.linux-amd64.tar.gz

#Move go to local

sudo mv go/ /usr/local

#Create a new folder go inside home

cd ~
mkdir go

#open .bashrc

pico ~/.bashrc

#go to the end of bashrc file and add the following:

export GOROOT=/usr/local/go
export GOPATH= /home/"name of new user"/go

export PATH=$PATH:$GOROOT/bin
#replace "name of new user" with your newly created user

Log out and Log back as a new user
 exit
su -  "name of new user"
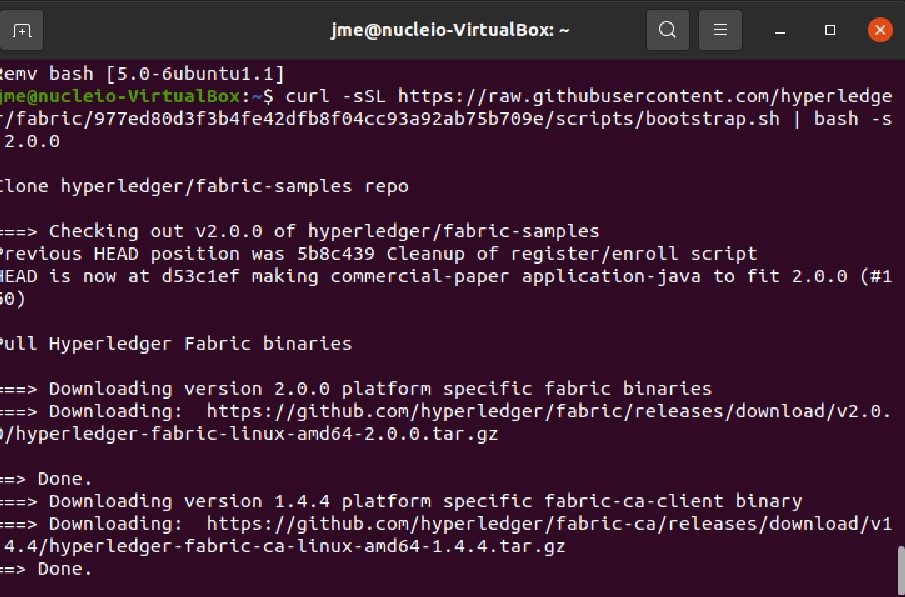
Step 3: Install Hyperledger Fabric Binaries, Docker Containers & Samples
curl -sSL https://raw.githubusercontent.com/hyperledger/fabric/977ed80d3f3b4fe42dfb8f04cc93a92ab75b709e/scripts/bootstrap.sh | bash -s 2.0.0
Step 4: Test the Installation
To make sure that everything works fine, you can deploy a test network by using scripts that are provided in the fabric-samples repository. The test network is provided for learning about Fabric by running nodes on your local machine. Developers can use the network to test their smart contracts and applications. The network is meant to be used only as a tool for education and testing and not as a model for how to set up a network.
Navigate to the test network directory by using the following command:
cd fabric-samples/test-network
In this directory, you can find an annotated script, network.sh, that stands up a Fabric network using the Docker images on your local machine. You can run ./network.sh -h to print the script help text:
Usage:
  network.sh <Mode> [Flags]
    Modes:
      up - Bring up Fabric orderer and peer nodes. No channel is created
      up createChannel - Bring up fabric network with one channel
      createChannel - Create and join a channel after the network is created
      deployCC - Deploy a chaincode to a channel (defaults to asset-transfer-basic)
      down - Bring down the network

    Flags:
    Used with network.sh up, network.sh createChannel:
    -ca <use CAs> -  Use Certificate Authorities to generate network crypto material
    -c <channel name> - Name of channel to create (defaults to "mychannel")
    -s <dbtype> - Peer state database to deploy: goleveldb (default) or couchdb
    -r <max retry> - CLI times out after certain number of attempts (defaults to 5)
    -d <delay> - CLI delays for a certain number of seconds (defaults to 3)
    -i <imagetag> - Docker image tag of Fabric to deploy (defaults to "latest")
    -cai <ca_imagetag> - Docker image tag of Fabric CA to deploy (defaults to "latest")
    -verbose - Verbose mode

    Used with network.sh deployCC
    -c <channel name> - Name of channel to deploy chaincode to
    -ccn <name> - Chaincode name.
    -ccl <language> - Programming language of the chaincode to deploy: go (default), java, javascript, typescript
    -ccv <version>  - Chaincode version. 1.0 (default), v2, version3.x, etc
    -ccs <sequence>  - Chaincode definition sequence. Must be an integer, 1 (default), 2, 3, etc
    -ccp <path>  - File path to the chaincode.
    -ccep <policy>  - (Optional) Chaincode endorsement policy using signature policy syntax. The default policy requires an endorsement from Org1 and Org2
    -cccg <collection-config>  - (Optional) File path to private data collections configuration file
    -cci <fcn name>  - (Optional) Name of chaincode initialization function. When a function is provided, the execution of init will be requested and the function will be invoked.

    -h - Print this message

 Possible Mode and flag combinations
   up -ca -r -d -s -i -cai -verbose
   up createChannel -ca -c -r -d -s -i -cai -verbose
   createChannel -c -r -d -verbose
   deployCC -ccn -ccl -ccv -ccs -ccp -cci -r -d -verbose

 Examples:
   network.sh up createChannel -ca -c mychannel -s couchdb -i 2.0.0
   network.sh createChannel -c channelName
   network.sh deployCC -ccn basic -ccp ../asset-transfer-basic/chaincode-javascript/ -ccl javascript
   network.sh deployCC -ccn mychaincode -ccp ./user/mychaincode -ccv 1 -ccl javascript
From inside the test-network directory, run the following command to remove any containers or artifacts from any previous runs:
./network.sh down
You can then bring up the network by issuing the following command. You will experience problems if you try to run the script from another directory:
./network.sh up
This command creates a Fabric network that consists of two peer nodes, one ordering node. No channel is created when you run ./network.sh up, though we will get there in another guide. If the command completes successfully, you will see the logs of the nodes being created:
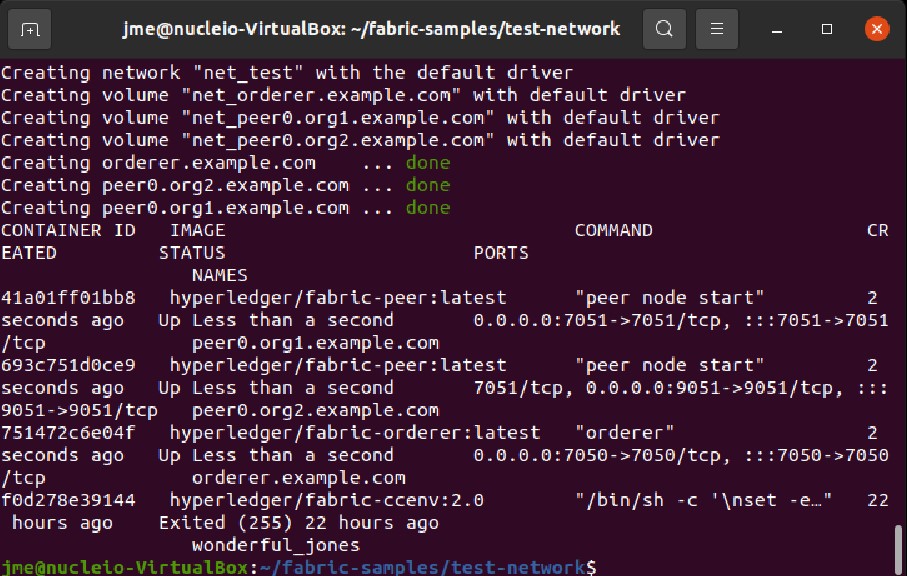
Check if all the docker containers are running:
docker ps -a
Clean the Network
./network.sh down
Congratulations! You have successfully installed Hyperledger Fabric in your machine.
References:
- https://bibek-poudel.medium.com/install-hyperledger-fabric-in-ubuntu-20-04-lts-665482204b0d
- https://hyperledger-fabric.readthedocs.io/en/release-2.2/test_network.html